How to Configure DNS over HTTPS (DoH) on Windows 11
Introduction
By default, DNS queries and responses are sent in plaintext (via UDP), which means they can be read by networks, ISPs, or anybody able to monitor transmissions. In an era where privacy and security are paramount, one of the easiest and most effective ways to protect your online activities is by using DNS over HTTPS (DoH). This method encrypts your DNS requests, preventing third parties from eavesdropping [1, 2].
Fortunately, Windows 11 provides support for DNS over HTTPS. Here’s a step-by-step guide to help you secure your DNS traffic using DNS over HTTPS (DoH).
What is DNS over HTTPS?
DNS over HTTPS (DoH) is a protocol that encrypts DNS queries and responses between your device and a DNS server. Unlike traditional DNS, which sends queries over an unencrypted connection, DoH encrypts these queries to ensure they can’t be intercepted or manipulated by third parties. This improves privacy and security, preventing man-in-the-middle attacks and making it more difficult to track your online activities.
Benefits of DNS over HTTPS
- Privacy Protection: Prevents unauthorized access to your browsing history.
- Security: Protects your DNS traffic from interception or alteration.
- Bypasses DNS Censorship: Some governments or organizations block certain websites via DNS. DoH can help bypass this censorship by encrypting DNS queries.
Configure DNS over HTTPS on Windows 11
At this time, Windows 11 only supports a certain set of free DNS services. You can view this list by running the following command:
netsh dns show encryption
Below is a list of currently supported public DNS servers. It’s best to choose two separate providers for primary and secondary services.
IPv4 Addresses
| DNS Service | Address |
|---|---|
| Google Primary | 8.8.8.8 |
| Google Secondary | 8.8.4.4 |
| Cloudflare Primary | 1.1.1.1 |
| Cloudflare Secondary | 1.0.0.1 |
| Quad9 Primary | 9.9.9.9 |
| Quad9 Secondary | 149.112.112.112 |
IPv6 Addresses
| DNS Service | Address |
|---|---|
| Google Primary | 2001:4860:4860::8888 |
| Google Secondary | 2001:4860:4860::8844 |
| Cloudflare Primary | 2606:4700:4700::1111 |
| Cloudflare Secondary | 2606:4700:4700::1001 |
| Quad9 Primary | 2620:fe::fe |
| Quad9 Secondary | 2620:fe::fe:9 |
You can configure DNS over HTTPS via by following the steps below:
- Right click on the Start menu and select Settings
- Click on Network & Internet in the left sidebar
- Select your network adapter — either Wi-Fi or Ethernet
- Click Hardware Properties
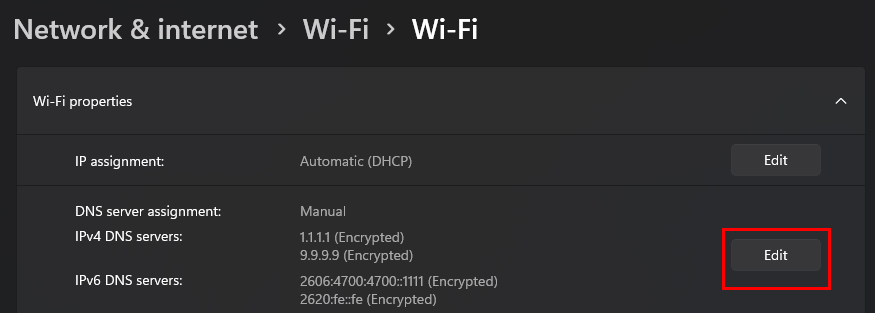
- Under DNS Server Assignment, click Edit
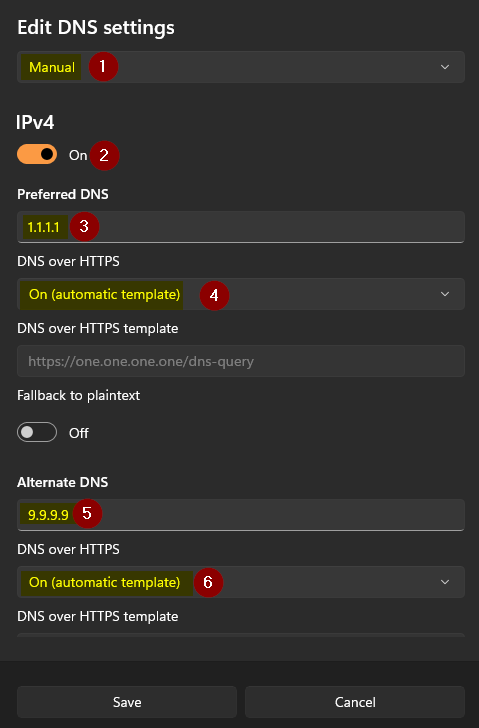
- Select Manual DNS configuration
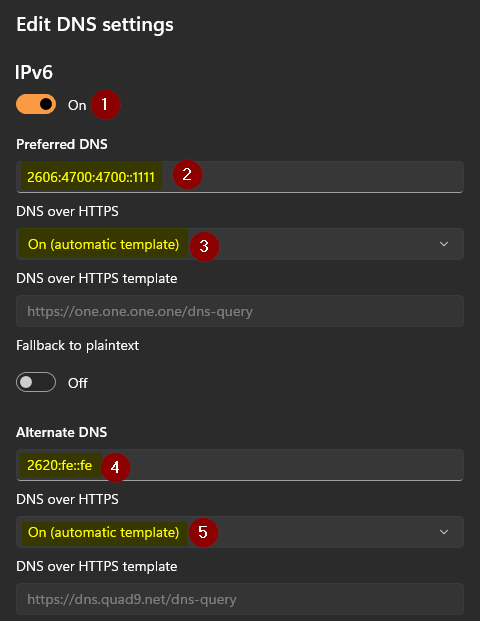
- Set your preferred and alternate DNS servers for IPv4 and IPv6
- Under DNS over HTTPS make sure to enable the option for On (automatic template)


To check if DNS over HTTPS is working properly:
- Open a browser and visit https://1.1.1.1/help.
- This site will tell you if DoH is successfully configured and functioning on your system.
If everything is set up correctly, it should show “Yes” for DNS over HTTPS support.
Troubleshooting
If you encounter issues, here are a few things to check:
- DNS Service Not Responding: Ensure that the DNS provider you’ve selected supports DoH.
- Network Conflicts: Temporarily disable any VPN or other network management software.
- Check Firewall Settings: Make sure that your firewall allows encrypted DNS traffic.
Conclusion
Configuring DNS over HTTPS on Windows 11 is a straightforward process that significantly improves your security and privacy online. By following the steps above, you can ensure that your DNS queries are encrypted and protected from prying eyes, enhancing your browsing experience. With the rising importance of cybersecurity and privacy, switching to DNS over HTTPS (DoH) is a small but impactful step toward securing your online activities.